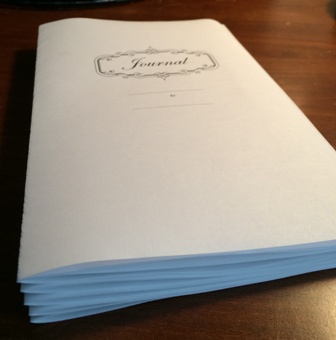
Handmade Journal: Step By Step
I was recently asked about instructions for the handmade journal that I made a while back. Here is a step-by-step guide.
Tools and Materials
I'll talk about these items in more detail in the following sections, but here is a list for quick reference:
- Cover fabric, 1/4 yard, or fat quarter
- Spine fabric, 1/4 yard, fat quarter or fat eighth
- 2 sheets of 12"x12" decorative endpapers
- Binder's board
- 25 sheets of 11"x17" paper, cut in half
- Linen thread
- Tapestry needle
- Bone folder (optional)
- 2 boards and clamps or vise for pressing
- Fine-toothed saw
- Mallet
- White Elmer's Glue
- Hide glue (optional)
- Brush for applying glue (required for hide glue; optional for white glue)
- Ruler
- Pencil
- Fabric marker
- Newspaper / scrap paper / waxed paper
- Unbleached muslin, approximately 4"x6"
- Spray starch
- Scotch Guard
- Embroidery floss in assorted colors, and inkle loom,
or 1/2"x22" ribbon for bookmark (optional) - Bookbinding headband (optional)
- 1 sheet of heavy paper / card stock
- Paper cutter
- Fusible adhesive (optional)
Preparing the Interior
The nice thing about doing your own book binding is that you can put anything you want in the book. You can use blank pages for a sketch book, lined pages for a journal, photos for an ablum, or just about anything else you can imagine. This particular journal consists of a title page, whose reverse is blank, a series of lined pages with scripture verses at the bottom, and a final page which is blank; 200 pages total. If you wish to use this layout, you may download the interior pages here.
The first thing to be aware of is the fact that paper has a grain to it. On a regular 8�"x11" sheet of paper, the grain runs lengthwise along the sheet. You can observe the grain by bending the paper in half, as shown below. The paper bends easily parallel to the grain, but you will notice that when you bend the paper perpendicular to the grain, there is a little more resistance.
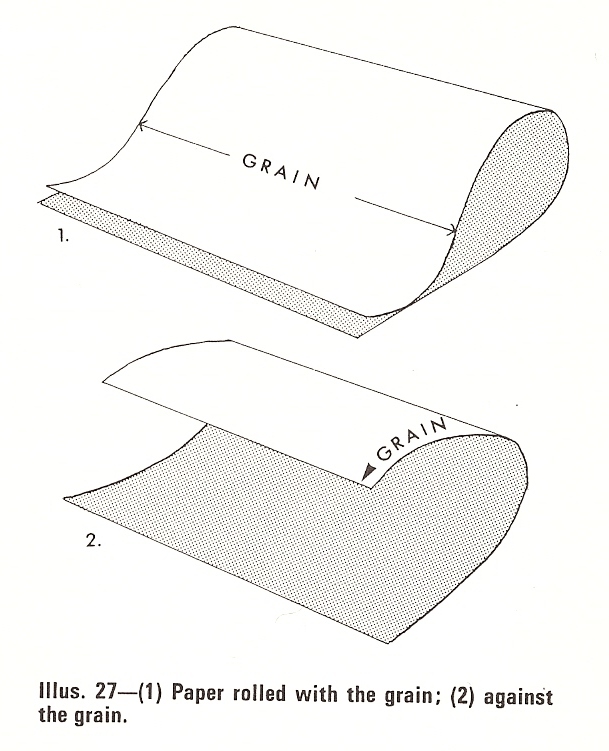
When you are binding a book, it is very important that the grain run parallel to the spine of the book. If the grain runs perpendicular to the spine, the pages will warp. This can be demonstrated as follows: Take two sheets of paper. Fold one parallel to the grain, and the other across the grain. Moisten each fold with water, and then let them dry. The paper folded with the grain will dry flat, but the paper folded across the grain will be wrinkled and warped.
The journal in this pattern is 5� by 8� inches. It uses 8�"x11" sheets of paper folded in half. But you will notice that if you fold a regular 8�"x11" sheet of paper in half, the grain will run perpendicular to the spine! That's bad. What this means is that you can't use regular 8�"x11" sheets of paper to make this journal. I learned this the hard way! On my first journal, I used regular paper, and the pages came out warped and buckled, which was really disappointing after all the work that went into making the book. What you need to do, then, is purchase 11"x17" paper, and get it cut in half. 25 sheets of 11"x17" paper will make one 200-page journal.
I know this can be a little confusing, in part because you can't readily see the grain of the paper without testing it as described above. The following diagram may help:
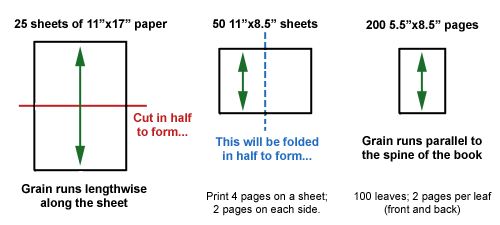
The green arrow shows the direction of the grain of the paper.
When you print your pages onto the 11"x8�" sheets, you will print them out double-sided, two pages on each side of the sheet, for a total of 4 pages per sheet. Each sheet will become 2 leaves of the book; there are 2 pages per leaf.
If you use the interior sheets provided, the order of the lined pages doesn't matter, but you should wind up with a blank page behind the title page, and a blank final page.
Folding the Sections
Once you have printed out the pages, fold 5 sheets together at a time to form ten 20-page sections (10 leaves in each section). A bone paper folder is handy to have for this purpose.
Sawing the Back
The next step is to saw holes in the back of the sections so that you can stitch the sections together. To do so, you will want to clamp the sections together between a pair of backing boards. My husband helped me to make a very simple book clamp, shown below, though you can also use ordinary C-clamps with a couple of boards.
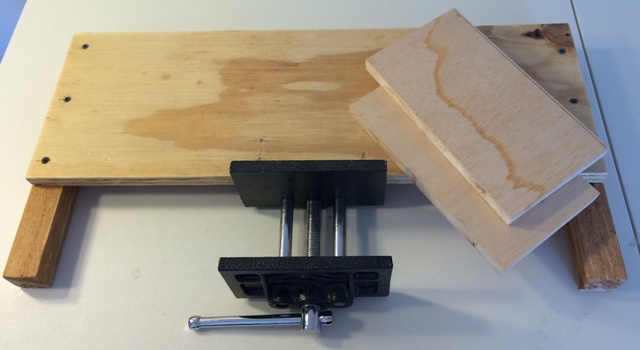
Draw lines across the sections to mark where you will saw the holes. I spaced mine about 1 inch apart, with a 3/4-inch section near the top. It is recommended that you space the holes asymmetrically so that you don't accidentally sew a section in upside-down. Just make sure they are all right-side up when you saw the holes!
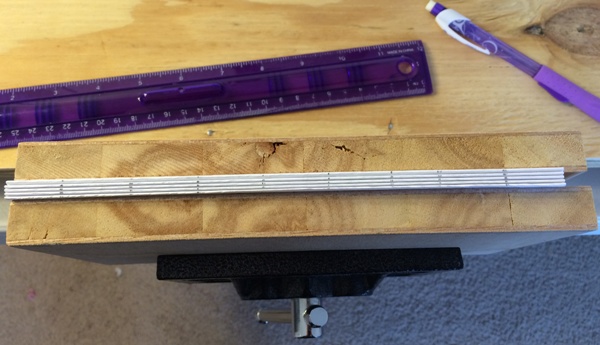
Saw across the lines you have drawn with a fine-toothed saw. Make sure you saw faw enough down to penetrate the innermost sheets in each section.
Sewing the Sections Together
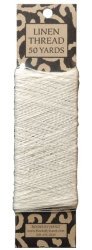 To sew the sections together, I used unbleached linen thread. As a substitute, you may also use cotton-covered polyester thread, doubled. You'll want to use a tapestry needle, which has a blunt point.
Sew the sections together using a lock stitch, as shown below. Begin by inserting the needle into the first hole in the section, laying the thread along the interior of the fold, and passing the needle out through the last hole. From the outside, take a small crochet hook, reach in through each sawcut and pull out a little loop of thread (figure A).
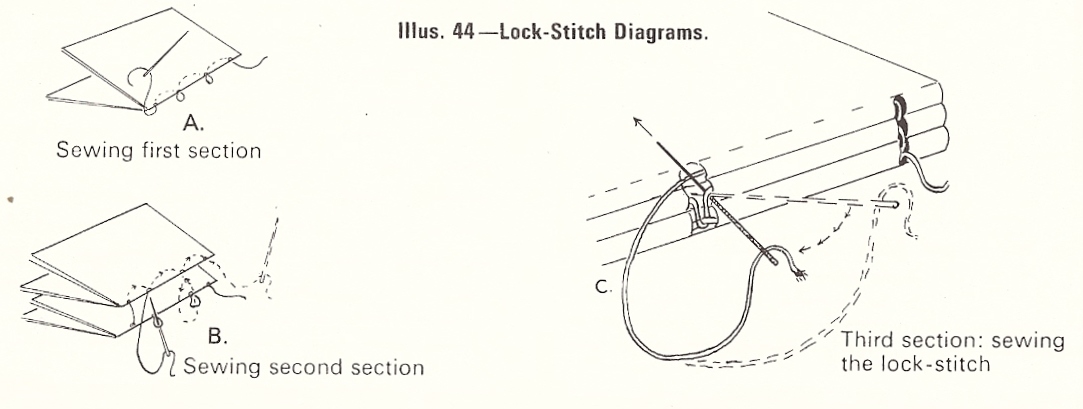
Lay the second section on top of the first. Pass the needle in through the hole above the one it just exited. Come out at each hole, pass the needle through the loop from the first section, and go back in the same hole (figure B). You will want to take up the slack in the thread, but do not pull the thread tight, as this may result in a less flexible spine. (If you pull it really tight, it could cut through your paper.) Exit the last hole in the section, and tie this to the tail from the first section with a square knot.
For the third and subsequent sections, bring the needle out of each hole, pass it under the thread from the previous section, and return through the hole just exited, as shown in figure C. When the last section is sewed, loop the thread around the previous section, knot it, and cut the thread with about a 1-inch tail. The thread ends will be glued into the spine.
The stitches will add thickness to the back of the book. This is reduced in part by hammering along the folds of the spine with a mallet, the face of the mallet flat against the book. When you have hammered one side, turn the book over and repeat on the other side. This is called "knocking down the swell".
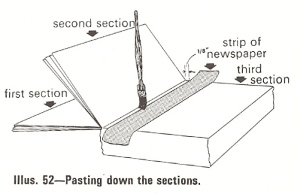
Pasting the Sections
The first two sections and last two sections of the book are reinforced with glue. White Elmer's Glue is best to use, as it dries transparent and flexible. Open up the first two sections of the book, place a piece of newspaper or scrap paper 1/8" from the fold (on the first page of the third section), and apply glue to the exposed strip. Remove the scrap paper, close the second section over the glue, and repeat between first and second sections. Turn the book over do this for the last 2 sections.
Endpapers
Decorative endpapers may be found wherever scrapbook supplies are sold. Remember that the same principle of grain direction applies to the endpapers as it does to interior pages. Scrapbook pages are often sold in 12"x12" sheets, so you can purchase 2 sheets and cut these down to 11"x8�", with the grain running along the short side. Once cut, fold these in half with the printed side facing inward.
Apply a 1/4" strip of glue along the fold of the first section (title page) of the book. Position one endpaper over the title page, and press down along the fold. Repeat this process with the last page of the book. After you have glued on the endpapers, clamp the book between the pressing boards and let the glue dry.
Backing Cloth
Backing cloth strengthens the back of the book, and it provides a hinge to which the cover boards will be attached. Heavy paper may be used, or starched, unbleached muslin.
The backing cloth will cover the spine of the book. Its width should overhang the spine by about 1�" on each side; the height of the backing cloth should cover all the stitches on the spine (so, approximately 3�"x5"). With the book clamped between the pressing boards, apply flexible white glue all along the spine, making sure the glue gets down in between the folds of the sections. Note that you never want to use a hard glue on the spine of a book; the spine needs to remain flexible. Lay the backing cloth on the spine of the book, press down firmly, and leave it between the pressing boards dry.
Trimming the Pages
Trimming the rough edges of your pages is an optional step that gives your book a fine, finished quality. In order to do this well, you need a very sharp guillotine. I've tried this with a hand plane with less than satisfactory results. You may be able to take your book to an office supply store to have them cut about 3/16" from each raw edge (top, bottom, and fore edge).
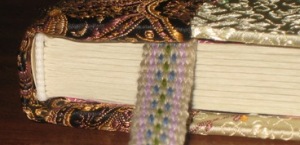
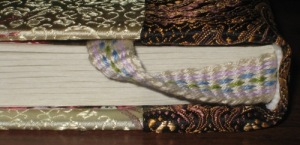
Bookmark and Headbands
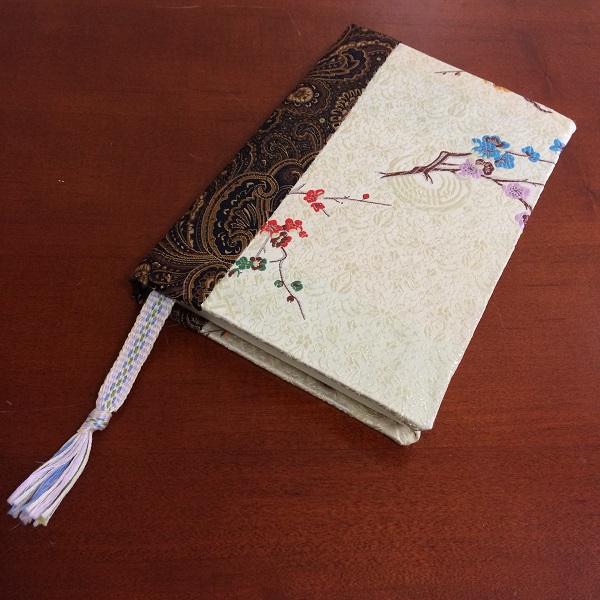
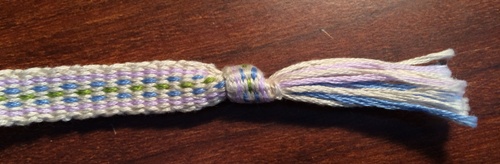
The bookmark was hand-woven on an inkle loom. Alternately, you may make or purchase a suitable ribbon or cloth bookmark about 1/2" wide. The bookmark I made used 21 strands of embroidery floss, with colors to match the book cover. Specifically, my pattern was: [CCCLLCCBCCGCCBCCLLCCC], where C=cream, L=lavender, B=blue and G=green. You may use my pattern generator to create a pattern of your choice to match your book cover fabric. The bookmark is twice the height of the book, plus about 5 inches, so it's a total of about 22 inches long. Knot one end with an overhead knot; the other end will be glued into the spine, so it won't need to be knotted.
Apply flexible white glue to the spine of the book, over the backing cloth. Place the bookmark along the spine, with the raw, unknotted end at the bottom of the book (not overhanging the edge), and the length of the bookmark with its finished end coming out the top of the book. Press the bookmark into the glue, getting it well-saturated.
Headbands are small pieces of decorative tape placed at the head and foot of the spine. One edge of the headband has a bit of piping in it, and this covers the folds of the sections, making your book look neat. Headbands are available in various colors.
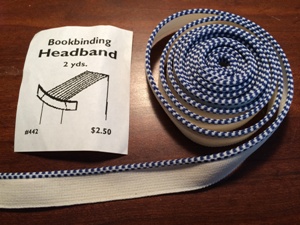
Cut a section of headband the width of your spine (about 1/2"), and glue this to the bottem edge of the spine, over the bookmark, with the rolled edge of the headband overhanging the folds of the sections. Repeat for the top of the book. Since the bookmark comes out the top, the headband will not directly cover the folds of the sections.
Hollow Back
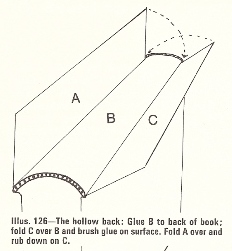 The final part of the interior preparation is called the hollow back. Cut a sheet of heavy paper 3 times the width of your spine, by the height of your book, about 1�"x8�". (It should fit just inside the edges of the headband.) Fold this lengthwise into thirds. With your book between the pressing boards, glue the center section onto the spine, over the bookmark. As shown in the diagram, fold one section over, and apply glue to the outside surface, then fold the other section over and press down onto the glue. This gives the book flexibility when it's opened.
Assembling the Cover
Cover Material
I like to use fabric for my book covers, because it is durable, flexible, and there is a great variety of colors and designs to choose from. The disadvantage of using regular cloth (as opposed to bookcloth, which is specially treated) is that it is not waterproof, and so it must be prepared properly so that the glue doesn't soak through the cloth. To prepare my fabric, I apply several coats of Scotch Guard, letting each dry and ironing the fabric between applications.
The cover boards are made of a heavy cardboard, sometimes call chipboard. For some projects it may be acceptable to glue 2 to 4 sheets of thinner cardboard together to get the desired thickness. As with the interior pages, be sure that the grain of the cardboard is parallel to the spine of the book. If you do glue sheets of cardboard together, clamp them between the pressing boards to dry so that the cardboard doesn't curl.
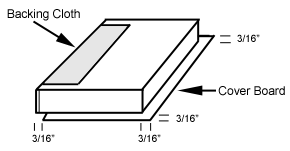
Your cover boards should measure the width of your book, and overhang the top and bottom about 3/16". Be sure to measure your book again after you've had the pages trimmed, because the dimensions will no longer be exactly 5�"x8�". Note that the width of your cover board will equal the width of your book. This is because the cover board does not extend all the way to the spine. It will be offset by about 3/16", leaving room for the covers to open, as shown in the diagram below:
Covering the Boards
After you have cut your boards, cover them with fabric. Cut your fabric with at least a 3/4" margin around the cover boards. Brush your glue onto one surface of the cover board. (Do not apply glue directly to the fabric.) For the cover, you may use hot hide glue, which dries hard, or you may continue to use white Elmer's Glue. In either case, allow the glue to become tacky enough not to penetrate the cloth before applying the board to the cloth. This is particularly important with the hide glue, because it will leave a stain if it penetrates the cloth. (I prefer the hide glue for this step, because it is easier to brush on a thin, even coat to the cover board.) After you have placed the board on the cloth, brush or pat the surface of the cloth lightly to make it adhere.

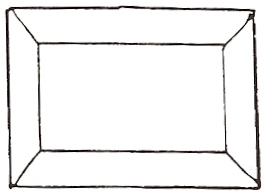
Next, turn the corners of the fabric over to the inside of the board as shown above. Mark the board to indicate where the corners will lie, and then apply glue to those corners. When the glue is tacky, turn the corners over and press them onto the glue. Then, starting with the long sides, fold the fabric to the inside of the board, mark the baord as you did with the corners, apply glue to the board, allow it to become tacky, and affix the sides to the inside of the board. When you are finished, you should have 2 boards that look something like this (from the back, or inside):
Place the covers between the pressing boards to dry, so that they do not curl.
The Spine
This journal pattern uses a contrasting spine. The material for the spine should be prepared in the same way as the cover fabric. The spine should measure twice the height of the book. Carefully measure the width so that it will overlap the cover by 1�" on each side, and add 1 inch for a seam allowance. (Remember to leave a 3/16" gap between the cover board and the back of the spine, as illustrated earlier.) So, all together, the width of the spine fabric will be 4 3/8" plus the thickness of your book including the cover boards.
To finish the long edges, fold over 1/2" of fabric lengthwise, and press. You may tack this in place with glue, or secure it using fusible interfacing. (If using glue, be sure not to let the glue penetrate the outer layer of fabric.) The short edges will be glued inside the book and do not need to be finished.
To assemble the spine, lay the spine fabric wrong side up, and place the cover boards wrong-side up on top of the spine, as shown in figure A. The cover boards should overlap the spine by 1�" on each side. With a fabric pen, mark the position of the cover boards. Pick up the front cover board, and apply a thin layer of glue, 1�" wide, on the outside of the board. Allow that to become tacky before placing the board back onto the spine, and pressing it into place. Repeat this process with the back cover board.
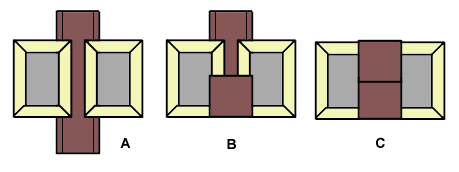
Once the boards have been glued to the spine and have been allowed to dry, apply flexible white glue to the wrong side of the bottom half of the spine fabric. When that becomes tacky, fold up the bottom half of the spine as shown in figure B, and press gently to adhere the fabric to the inside of the boards. Repeat with the top half as shown in figure C. Allow the glue to dry before proceeding.
Attaching the Cover to the Book
To attach the cover to the book interior, begin by applying flexible white glue to the hollow back of the spine. When that becomes tacky, position the cover on the book, press in place, and let the glue dry with the cover closed around the book.
When the spine is dry, gently open the front cover. On the back of your endpaper, draw a light guideline 3/16" from the spine. Place a sheet of waxed paper just under the first endpaper. Leaving that 3/16" gap clear, apply hot glue or white glue over and under the backing cloth, and all over the back of the endpaper. Carefully close the front cover onto the glued endpaper, just enough to stick. Lift it up and check to see if the endpaper is on straight. If not, peel it off and try again. When it is straight, close the cover and press firmly. Open the cover and rub the endpaper down with your hand, then close the cover again. Remove the waxed paper, and clean off any excess glue. Repeat this with the back cover. I like to prop the covers open slightly (about 1/4") as the endpapers dry, just to make sure that nothing gets accidentally glued shut. (It's happened.)
Once the endpapers are dry, return the book to the pressing boards, clamp it shut, and leave it in the press overnight.
To properly open a book for the first time, stand the book on it's spine, and let the covers fall open. Holding the center section with one hand, open a few pages, and run your other hand along the crease. Alternate sides until you come to the center of the book. This gently breaks in the spine and keeps it flexible.
For Further Reading
 Some of the illustrations in this article were taken from The Craft of Bookbinding by Manly Banister. This is an excellent book for anyone who is really serious about the art. It does get a bit technical, and tends to assume the availability of professional tools and equipment.
 Another fun resource is
Handcrafted Journals, Albums, Scrapbooks & More by Marie Browning. This book is geared more toward the hobbyist, and includes lots of creative suggestions, as well as easy techniques for binding single sheets.
Another fun resource is
Handcrafted Journals, Albums, Scrapbooks & More by Marie Browning. This book is geared more toward the hobbyist, and includes lots of creative suggestions, as well as easy techniques for binding single sheets.


They will enter Zion with singing;
everlasting joy will crown their heads.
Gladness and joy will overtake them,
and sorrow and sighing will flee away.